Monday, May 31, 2010

Berry Bowls are Full of Holes!

by Eleanor Hendriks

One of my spring projects was to get properly stocked up on Berry Bowls and I'm thrilled to be able to say that I've accomplished that goal... but along the way I was reminded that...

...Berry Bowls are FULL of Holes!


Each of those little bits in the pile on the right represents a hole that had to be cut in one of the many berry bowls I made. I was only half way through them all at the point this picture was taken and of course, the picture doesn't include all the bits that rolled away onto the floor either! The funny thing is that I could probably just put half a dozen holes in the bottom and the bowl would function as a colander perfectly well. But I'm really attached to my flower pattern of holes and can't imagine changing it any time soon. So every once in a while, I can expect to be nearly overwhelmed by hole cutting.


And it doesn't end with cutting out the holes. Each hole is also beveled inside and out so that the bowl is a smooth and pleasant experience for the user.

I eventually finished all of this spring's mega batch of berry bowls and my Etsy store is fully stocked with two sizes in five rim colours. You can find them here.


Wedding and shower season is upon us. May I suggest that a collection of handmade kitchen goodies like a Berry Bowl, French Butter Dish and a Garlic Grater would make for that perfect combination of practical and beautiful that should please any new couple. A blender is practical, but oh so boring, a painting may be beautiful but totally miss the mark for the new couple's preferred style. Try handmade and functional to really bless your friends...

French Butter Dish


Garlic Grater

Saturday, May 08, 2010

Scavenging -Part of the Potter's Life

by Eleanor Hendriks

It seems that every potter I know has a bit of scavenger blood. It seems I'm always saying things to people like "If you ever have any empty drywall mud buckets, save them for me..."or "Don't throw out those Styrofoam peanuts -just give me a call, I'll come get them..." Sometimes the effort that goes into scavenging these things is enough to make me think about taking the easy way out and just buying what I need new, but that always feels just a bit wrong. I get a kick out of using something that would have otherwise been thrown away -especially when it is plastic made from non-renewable resources.

Just lately I had a great score -a just-up-the-road neighbour was telling me about the new kitchen he was putting in and worrying about what he was going to do with all the bubble wrap the cupboards were wrapped in. Of course I jumped on that one and sure enough, he stopped by a few days later with a carload of bubble wrap for me. I got it all straightened out and folded neatly -now I just have to figure out where to put it:


Of course I'll gladly share this latest score with you -all you have to do is order a pot from my Etsy shop and it will come wrapped in some of Keith's bubble wrap!

Sunday, April 04, 2010

Clay Totem Poles with Kids

by Eleanor Hendriks

I had the opportunity to teach a clay elective at my childrens' grade school recently. I had a group of 11 children from grade one to grade eight. The age spread kind of freaked me out and I decided to deal with it by doing two projects -one for the older kids -4 boys from grade 6 and 8, and a different project for the 7 children from grade 1 to 3.

The project for the 4 boys was to make a totem pole using slabs and a Pringles can. Since we weren't at my studio with access to my oh-so-handy slab roller, the boys got to roll their own slabs using rolling pins, 1/4" slats to control the thickness and canvas sheets to keep the clay from sticking to the slick school tables. You can see the basic method for making the pole form in this castle tutorial.

I handed out pictures of traditional totem poles and talked a little about the symbolism of the creatures and different design elements. I would have loved to get into this in more depth, but I was juggling the younger kids' project at the same time, so this got short shrift. They sketched out their ideas on scrap paper for a few minutes and then got busy on their creations.

I had the boys divide their poles horizontally into sections to accommodate the number of creatures they planned to make and I asked them to make any elements that would stick out further than a couple of inches first so that they could set them aside to stiffen up before attaching. Even so, some pieces required clay props to keep them from sagging while they dried.
Because I hadn't done this project with a group before and didn't know how long it would take, I had them work from the top down, in case they ran out of time before accomplishing all the creatures. I explained that they could put more creatures in using paint during the second session.

During the second session they painted their poles with underglazes. I encouraged them to look again at the traditional totem poles and make note of the amount of design work executed in paint. I gave them pencils to lay out some design work on the pieces before they began with the underglazes. I was impressed with the amount of time and focus the boys (yes, I said BOYS!) put into their painting. And I have to say, the results are fabulous -don't you agree?


Sorry, no photos of the process, I was busier than a long-tailed cat in a room full of rocking chairs. I'll show you what the younger kids made another time...

(Is OK that I am inordinately proud of the creator of the last totem pictured? It was made by my eldest son...)

Sunday, March 28, 2010

It was a Good Yarn

by Eleanor Hendriks

Wow -lots of ideas about how to glaze the Yarn Bowls with the tricky holes and slots! And some of you got very close...

So here is how I do it:
First I glaze the inside by pouring the light blue glaze. Inevitably, some of the glaze gets on the outside. I sponge this off and let the piece dry.

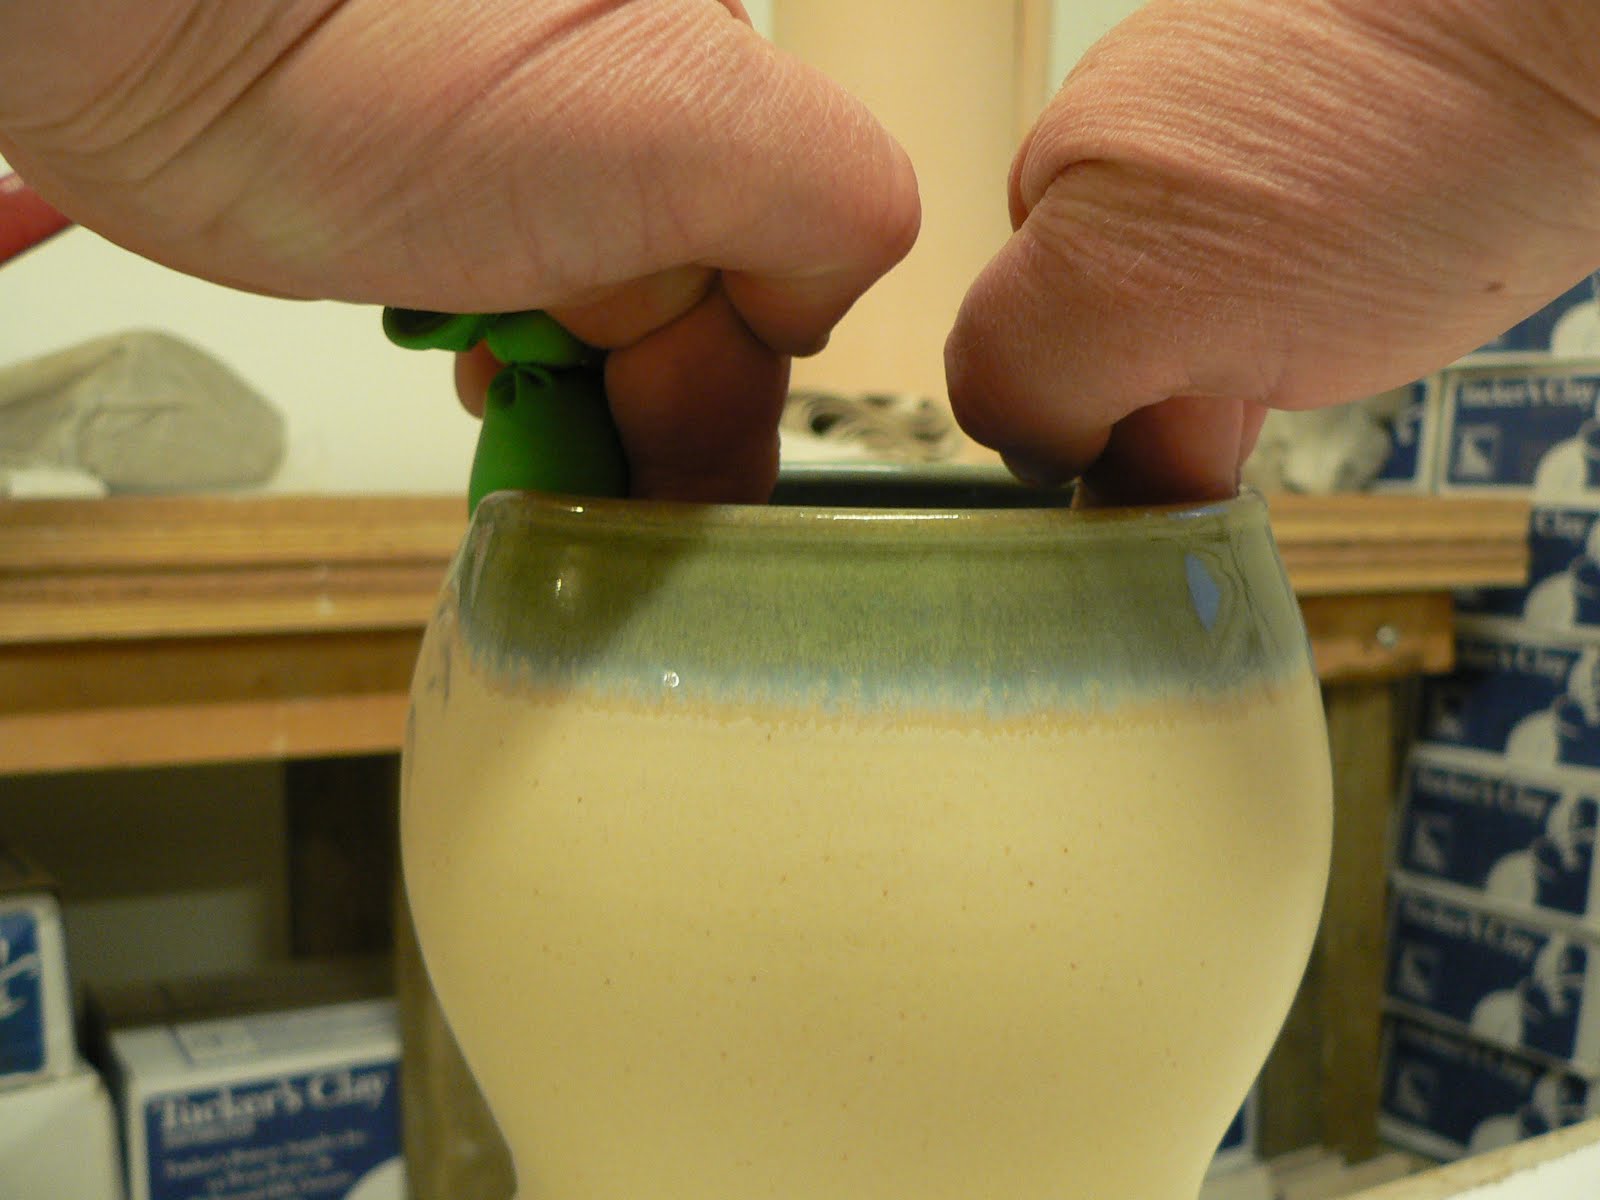
Then I glaze the outside by holding it upright and dipping it into the finicky cream glaze. The secret weapon for keeping the cream glaze on the outside and not running through the holes is -some of you guessed it -a balloon! But I don't blow it up. I have filled it with 110 mesh silica sand which has a 'grippy' quality. I can shape the balloon to the contours of the pot and a little into the holes and it will keep it's form... see my thumbprint...
Sand balloon pressed against the pot from the inside (sorry, I only had a finished piece to demonstrate with -imagine that horrible stark white bisque instead)...
I hold the piece upright with my hands only touching the inside -the left one holding the sand balloon in place and dip it up to the rim in the cream glaze. (Yes, I know I need to get some lotion on those desert lizard skin hands...)
And finally, I dip the rim in the third colour of glaze that I thicken by leaving it on top of my furnace boiler. This little purple dish has proved invaluable for dipping an even depth of glaze on rims. It came with a child's bubble blowing set as a dip tray for an over sized bubble wand. For once I was happy when the kids spilled the container of bubble juice before it was finished -then I could have the dish without having to wait! The little spout makes it extra handy. If I ever lose this, I plan to make a clay one to replace it...
I wish I could remember how I got the brainwave of putting the sand in the balloon.I would love to have that kind of problem solving inspiration on tap at all times...

Here's another solution to a problem that comes up in many potter's studios. How to keep trimmings from flying all over the studio? A while ago, Emily Murphy called for suggestions to solve this problem. I didn't submit mine because I'd always intended to come up with something better, like this solid solution by Ben Stark. My solution is a cardboard box cut to fit under the splash pan with flaps going past it on the side and reinforced with duct tape. Some trimmings escape on the left side, so I put an empty clay box on the floor where they would otherwise land and I'm good to go...
I made this 10 years ago as a stop gap measure until I could come up with something better. 10 years later, I have decided that if this one ever bites the dust, I'm going to take 15 minutes and make another one out of cardboard and duct tape -it's worked well enough until now and I always have plenty of both around!

Saturday, March 13, 2010

A Contest for Potters

by Eleanor Hendriks

I'm not really the blog giveaway type of girl, but I have an idea that I thought might be fun...

To the potter who can figure out how I glaze these Yarn Bowls I will send a piece of pottery handmade by me.


I'm thinking one of my Sweetheart Mugs might be a nice prize...

This is how they look when the Yarn Bowls look when they are finished:


So, here are the parameters:
I don't brush any of the glazes on. I hate brushing and these glazes don't turn out well if they are brushed.
I don't use wax. I always goof when I use wax and end up refiring things to get rid of stray wax.
The cream glaze on the outside must be dipped to get the effect I like.

So the question is, how do I get one colour on the inside, a different colour on the outside and a third colour on the rim without having the notch and hole allow glaze to get to places it shouldn't be? I'll do a gimme on the colour in the stamped impressions -I brush on underglaze and wipe it off to leave colour only in the impressions. The rest is up to you to puzzle out...

If you figure out how I do it, I'll send you a mug.

Even better, if you figure out a way that works better than what I am presently doing and gets the same results, I'll come up with a bigger pottery prize!

Post your solutions in the comments...

Friday, February 26, 2010

I have a New Man in My Life

by Eleanor Hendriks

His name is Peter. I met him on Valentine's Day and I'm in love.

So here's the whole juicy story. I bought a Peter Pugger/Mixer from another potter who was upgrading and the only day we weren't both busy was Valentine's Day so that was the day we arranged to go and pick it up. My handy hubby (yes, I'm keeping him too) and I spent the most romantic day driving to get the pugmill, rearranging the studio to accommodate it and testing it out on my huge pile of reclaim.

This great machine is more than just a pugmill, it is also a mixer, which means I can put dry trimmings and chunks, slop, water and workable clay in it to be reconstituted. The only thing it won't mix up is leatherhard clay. Also, is has a vacuum pump, so the clay comes out deaired, there is no need to wedge! Be still, my beating heart...

My hubby loves the pugmill too! So much so, that he volunteered to turn my three year pile of reclaim back into usable clay. He's already made noticeable progress.

New love is just the thing to brighten up the depths of winter!

Wednesday, January 27, 2010

News Flash for Lovers...

by Eleanor Hendriks

Sweetheart Mugs are now available in my Etsy shop!

Cranberry Red


Weathered Ivory (with a touch of palest Pink)


My dear American friends, I can still get one of these to your Sweetheart for Valentine's Day but please, please, place your order before the end of day on Sunday -thanks!

Just spreading the love.

Friday, January 22, 2010

Don't Break my Twigs

by Eleanor Hendriks

When I make a batch of things the same size I use something stuck into a blob of clay on the edge of my splashpan to mark the height and width so I don't have to measure each piece as I work.

For about 10 years I used a twig plucked from a bush outside the door of my old studio in Fergus. It was just the right length and thickness and, most importantly, it had a bit of spring so that if I made something a bit too wide it would bend and ride on the surface of the clay instead of digging in and making an unwanted groove in the piece. It was a very special twig that I always used and that had a place of honour in my toolbox. The bush it came from succumbed to a combination of cold winters and my lackadaisical gardening efforts a few years after I plucked the twig, so there was no ready source for more of the same.

One day, a friend was sitting in the studio and chatting with me while I worked (something I had been begging him to do for ages). He is an incurable fiddler and can never have his hands empty. He picked up this very special twig and, much to my horror, proceeded to snap it into teeny weeny bits as we talked. I didn't dare say anything because I didn't want to chase him away. I hoped to find a replacement twig without telling him what he had done.

I have never found a suitable replacement.

I tried broom straws from traditional style brooms, twigs and grasses from wherever I could find them but never found something that worked as well as my original twig. For the last 8 years or so I have settled on bamboo skewers as my new clay marker. They work reasonably well. They are long enough, thin and come to a nice sharp point for marking but they just don't have the spring that made my original twig so perfect.

Then one day, not so long ago, I couldn't find any bamboo skewers as I prepared to make a set of mugs. Not wanting to waste time looking I grabbed the nearest long thin stick-like object as a substitute. That object happened to be a thin paintbrush. As I was sticking it into my lump of clay, I realized that the pointy brush end would be a perfect marker! The handle was long and thin enough and the brush end could ride along a too wide pot without marring the surface. Why hadn't I thought of this sooner?!?


This brush is now my new twig. If you come to visit my studio and see me scurrying to hide something as you come in, don't worry, I'm not up to anything illegal, I'm just hiding my twig!

Sunday, January 17, 2010

Streamlining the Process

by Eleanor Hendriks

When I sit down to make a batch of similar pots, I often think about ways to speed things up. I like to think of myself as an artist and I strive for some level of artistic vision in everything I make, but let's face it -some things about being a potter are factory-like. And if I'm going to spend time being factory-like, I may as well be an efficient factory. Theoretically, this will leave more time for the pieces closer to my heart that just can't be churned out.

This past week, one of my goals was to restock my French Butter Dishes. My latest version of a French Butter Dish has a knob that is thrown onto the lid portion of the dish. Previously, I made this knob by trimming the lid, attaching a small ball of clay, centering it and then throwing the knob like a small, short walled bowl.

I got to thinking that there had to be a faster way. Centering small pieces of clay is tricky and slow. Opening right down to the lid seems like a waste of effort. So, I devised this way to make knobs without having to center or open. So far, now that I've had a bit of practice, it seems to be a bit quicker. I'll have to make another batch to evaluate further. But, in the meantime, I thought I'd share my efforts with you...

I started with a 2" thick log of softish clay...

...sliced it into 1"ish discs...
...poked a hole through each with my thumb...

...trimmed the Butter Dish lid...
...scored and slipped where the knob would be attached... (sorry so blurry!)...
...stuck the doughnut firmly and evenly all around...
...and started throwing it, making sure it was attached all around...

...threw to the final thickness ignoring the ragged top edge...
...trimmed to the required height with a needle tool... (I'll cut the discs a little thinner next time because I had to cut off quite a lot to get the right height)...
...smoothed off the rim...
...did a final shaping...
...completed batch of eight.
These will be hitting my Etsy shop in a couple of weeks. I'm planning on glazing them Powder Blue, Spring Green, Bright Cobalt Blue and maybe one other colour...
Now I just need to make enough ware to fill the rest of the kiln, including another batch of the Now Even Faster French Butter Dishes...

Saturday, January 09, 2010

First post of 2010

by Eleanor Hendriks

I was so excited to get back to clay this week. Holidays and shipping have kept me away from gooey wet delicious clay for many weeks and I could almost taste the mud. But, things didn't go as planned...

I had a turkey carving cut on a finger that was surprisingly painful, my clay was too hard, my studio was too cold and I just couldn't find the rhythm. I just kept working and I did have reasonable results but I was surprised not to find The Zone right away. I should know better by now -even though I can sit down at a wheel and make pretty much anything I want whenever I want, The Zone -that space where time doesn't exist and the clay leaps into shape -is still elusive. It takes a combination of time in, repetition and mindfulness that isn't always instant. As always, I have high hopes for next week...

In the meantime, I have Sweetheart Mugs well under way...

Despite good intentions to the contrary, I usually only get one batch of these done per year, so if you'd like me to reserve on for you, just let me know. Don't worry, the finished product won't be so shaggy looking. There's still some smoothing and glazing time to be put in...
These will be available in my Etsy store before the end of January -I may even try some not so traditional Valentine's colours...
Related Posts with Thumbnails