Wednesday, December 01, 2010

Prize Winner!

by Eleanor Hendriks

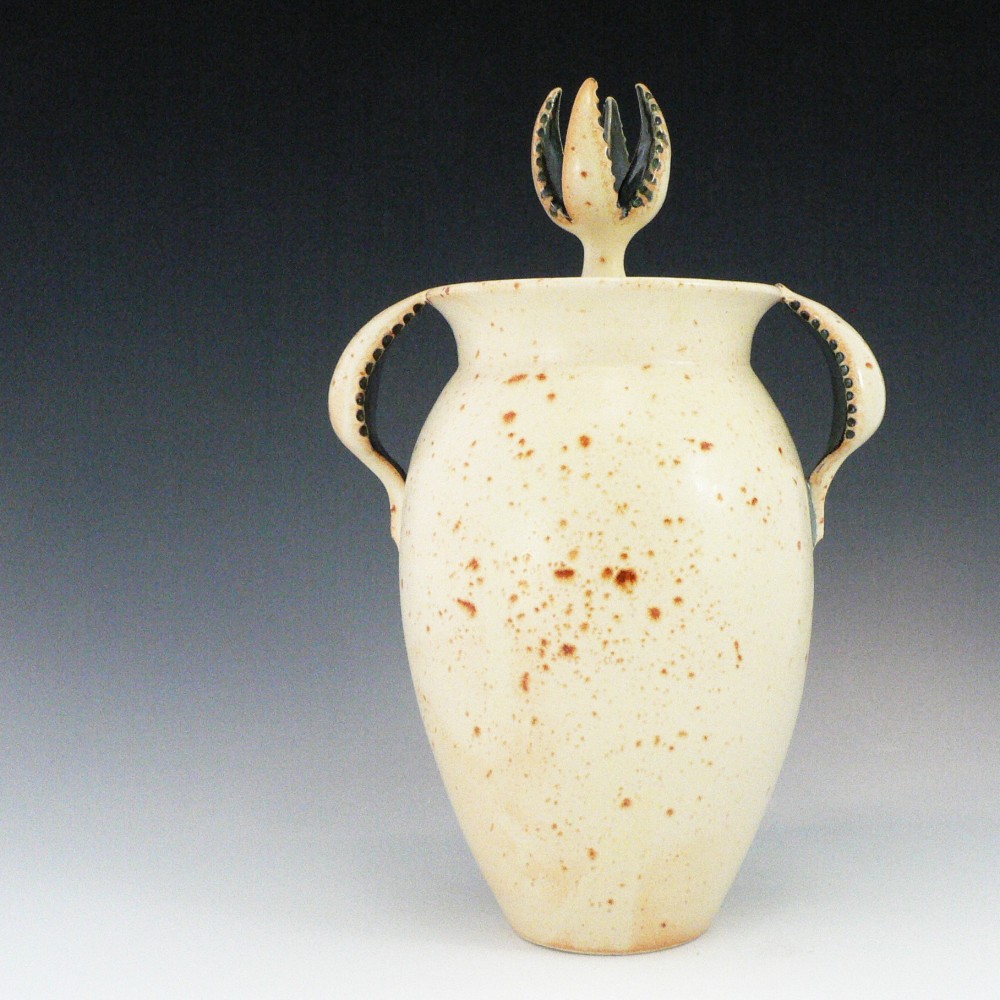
I was just thrilled two weekends ago to be the lucky recipient of The Best in Show Award at the Northumberland Potters Guild Annual Sale! This piece, one of my Milkweed Pod Jars, was the one that did it for me...


It sure feels good to be recognized for work you love by pottery peers at a time of year when all that seems to be important about your art is it's dollar value. The cash prize that comes with winning doesn't hurt either...

So thank you to the Guild and the Juror for lovely boost!

Monday, November 22, 2010

Studio Space Saver

By Eleanor Hendriks

At this time of year I have ware boards of stuff everywhere and since the ware racks I've been dreaming of for more than 10 years haven't been executed yet, I had to come up with something to clear off some table surfaces so I could fill them up again. The worst culprits for wasting space are the flat ornaments and small trays that I make in big batches and then use as kiln filler.

So with a few construction offcuts of 2x2s and 2x4s I created this surprisingly stable stack of flat stuff next to my kiln.


Thanks to Matt of http://www.etsy.com/shop/MossBeachCeramics for the inspiration for this creation. His suggestion of stacking plates on bats using kiln furniture to save space (and even out drying) freed my mind from the need for actual shelving to put my boards on. This is a real "Why didn't I think of this earlier?" moment!

Thursday, November 18, 2010

Make a Petal Bowl -Pictorial Tutorial

by Eleanor Hendriks


Thursday, November 04, 2010

4th Annual StudioÉlan Christmas Art Sale

by Eleanor Hendriks


Pottery -Eleanor Hendriks
Watercolour -Janice Addison
Stonecarving -Peter Martin
Handsewn Gifts -Rene Buist
Stained Glass and jewellery -Janet Tysiak
Woodturning -Morris Young

Friday November 5, 6-9pm
Saturday November 6, 11-6
Sunday November 7, 11-6

From Hwy 121 just north of Fenelon Falls,
turn east onto Victoria County Road 8 and
south onto Hickory Beach Road. #97

Please join us for a lovely weekend with art. Let me know you saw it on the blog and I'll give you $5 Élan dollars to spend on pottery!


Sunday, October 24, 2010

Make it Work Moment

by Eleanor Hendriks

Only dribs and drabs here at the blog even though I have tonnes of great posts floating around in my head. I need a time machine -the kind that makes more time!

I revisited the project that left me feeling kinda blah back in August and I think I've come up with a good solution. Adding the pedestal resolved the proportion problems and some creative reshaping and carving have (hopefully) solved the thickness problems....
At least now I can stop taking the time to spray and rewrap it every time another day comes to an end without a chance to finish it. Two months is the longest I have ever kept a large project in progress in a workable state. I have kept smaller parts moist longer in my plaster lined rubbermaid box, but this piece didn't fit. And now that the cold weather is here and heating season has begun, I had to finish or abandon the work I had already put into it because the drafts and dry air would make the decision for me otherwise.

Some delicious details...


Of course now I have to figure out how to glaze it... will it be another 2 months before you hear from me again? Let's hope not...

Wednesday, August 25, 2010

Thank goodness my life isn't Project Runway

by Eleanor Hendriks

If it were, the other contestants would be whispering behind my back that I will be the next one going home and Tim would be telling me to Make It Work!

I've got a week of reduced family responsibilities and so I have the opportunity to tackle some unusual projects and try a few experiments.

The first project went reasonably well -an 18" replica of the Stanley Cup -a custom order I took on for I'm no longer sure what reason. But with pretty clear parameters, this type of project is a test of skill -not creativity...


The next project is the one that is has the potential to get me kicked off the island. At this point it looks like that PR favourite criticism, a Hot Mess.


The proportions aren't what I intended. The varying thicknesses are causing me trouble. I'm having uneven drying problems. On top of the technical details, I don't love what I'm making as much as I loved the the idea I had going in.


But like those quirky young designers, I'm out of time. I've got to get back to regular production next week. It is too humid to start over and have any hope of new pieces drying enough to complete this week. I'm going to stick with it for a bit longer though.

Maybe I can still Make It Work!

Saturday, June 12, 2010

Just do it once already!

by Eleanor Hendriks

Even though I've been at the pottery gig for a few years now, I can still catch myself doing stupid things.

Just the other day I was making handles for a batch of mugs. Because I was a little distracted while I was making them, I ended up recounting how many I had already at least 4 times.

Finally I got so fed up with myself that I reorganized the handles into groups of 5 on the board so that I could see at a glance whether I had enough for my 2 dozen mugs yet...


Since this was a doing stupid things day, I made a couple of extra handles too, just in case...

I didn't need the extra handles, but the groups of 5 is going to be a new regular studio practice.

Monday, May 31, 2010

Berry Bowls are Full of Holes!

by Eleanor Hendriks

One of my spring projects was to get properly stocked up on Berry Bowls and I'm thrilled to be able to say that I've accomplished that goal... but along the way I was reminded that...

...Berry Bowls are FULL of Holes!


Each of those little bits in the pile on the right represents a hole that had to be cut in one of the many berry bowls I made. I was only half way through them all at the point this picture was taken and of course, the picture doesn't include all the bits that rolled away onto the floor either! The funny thing is that I could probably just put half a dozen holes in the bottom and the bowl would function as a colander perfectly well. But I'm really attached to my flower pattern of holes and can't imagine changing it any time soon. So every once in a while, I can expect to be nearly overwhelmed by hole cutting.


And it doesn't end with cutting out the holes. Each hole is also beveled inside and out so that the bowl is a smooth and pleasant experience for the user.

I eventually finished all of this spring's mega batch of berry bowls and my Etsy store is fully stocked with two sizes in five rim colours. You can find them here.


Wedding and shower season is upon us. May I suggest that a collection of handmade kitchen goodies like a Berry Bowl, French Butter Dish and a Garlic Grater would make for that perfect combination of practical and beautiful that should please any new couple. A blender is practical, but oh so boring, a painting may be beautiful but totally miss the mark for the new couple's preferred style. Try handmade and functional to really bless your friends...

French Butter Dish


Garlic Grater

Saturday, May 08, 2010

Scavenging -Part of the Potter's Life

by Eleanor Hendriks

It seems that every potter I know has a bit of scavenger blood. It seems I'm always saying things to people like "If you ever have any empty drywall mud buckets, save them for me..."or "Don't throw out those Styrofoam peanuts -just give me a call, I'll come get them..." Sometimes the effort that goes into scavenging these things is enough to make me think about taking the easy way out and just buying what I need new, but that always feels just a bit wrong. I get a kick out of using something that would have otherwise been thrown away -especially when it is plastic made from non-renewable resources.

Just lately I had a great score -a just-up-the-road neighbour was telling me about the new kitchen he was putting in and worrying about what he was going to do with all the bubble wrap the cupboards were wrapped in. Of course I jumped on that one and sure enough, he stopped by a few days later with a carload of bubble wrap for me. I got it all straightened out and folded neatly -now I just have to figure out where to put it:


Of course I'll gladly share this latest score with you -all you have to do is order a pot from my Etsy shop and it will come wrapped in some of Keith's bubble wrap!

Sunday, April 04, 2010

Clay Totem Poles with Kids

by Eleanor Hendriks

I had the opportunity to teach a clay elective at my childrens' grade school recently. I had a group of 11 children from grade one to grade eight. The age spread kind of freaked me out and I decided to deal with it by doing two projects -one for the older kids -4 boys from grade 6 and 8, and a different project for the 7 children from grade 1 to 3.

The project for the 4 boys was to make a totem pole using slabs and a Pringles can. Since we weren't at my studio with access to my oh-so-handy slab roller, the boys got to roll their own slabs using rolling pins, 1/4" slats to control the thickness and canvas sheets to keep the clay from sticking to the slick school tables. You can see the basic method for making the pole form in this castle tutorial.

I handed out pictures of traditional totem poles and talked a little about the symbolism of the creatures and different design elements. I would have loved to get into this in more depth, but I was juggling the younger kids' project at the same time, so this got short shrift. They sketched out their ideas on scrap paper for a few minutes and then got busy on their creations.

I had the boys divide their poles horizontally into sections to accommodate the number of creatures they planned to make and I asked them to make any elements that would stick out further than a couple of inches first so that they could set them aside to stiffen up before attaching. Even so, some pieces required clay props to keep them from sagging while they dried.
Because I hadn't done this project with a group before and didn't know how long it would take, I had them work from the top down, in case they ran out of time before accomplishing all the creatures. I explained that they could put more creatures in using paint during the second session.

During the second session they painted their poles with underglazes. I encouraged them to look again at the traditional totem poles and make note of the amount of design work executed in paint. I gave them pencils to lay out some design work on the pieces before they began with the underglazes. I was impressed with the amount of time and focus the boys (yes, I said BOYS!) put into their painting. And I have to say, the results are fabulous -don't you agree?


Sorry, no photos of the process, I was busier than a long-tailed cat in a room full of rocking chairs. I'll show you what the younger kids made another time...

(Is OK that I am inordinately proud of the creator of the last totem pictured? It was made by my eldest son...)
Related Posts with Thumbnails